Make it Monday: DIY Flowers for your Bridesmaids
When I got married, almost five years ago (WHOA!), I didn’t have much for funds but I wanted to give them each a little something. So I headed over to Etsy.com and found each some earrings that they all wore on the wedding day. Had I been more DIY minded I would have made them something cute like these flowers.
My very DIY bride, Hannah, and her mother, Francee, made these amazing flowers for all of Hannah’s friends. She opted not to have bridesmaids but wanted to make sure they knew they were important in her life. All the grils who got flowers, took it upon themselves to wear colors that matched the wedding and were adorned with these amazing flowers on the big day. It was fantastic!

I’ll be posting the wedding photos tomorrow! So check back for more great DIY projects then!
These are uber easy to make. They do require some attention, because it involves FIRE! Yes that’s right, fire breathing dragons. Ok, just a lighter. I have to use the big gun looking ones because, fact, I cannot use cigarette lighters to save my life.

Down to brass tacks.
What you’ll need:

- Synthetic fabric in as many colors as you like! (I used polyester satin, only 1/4 yard of each)
- Sharp scissors
- Lighter
- Needle and thread
- Cute button
- Glue gun
- Aligator clip
Step 1: Cut out your circles in decreasing sizes. I did not use a template so it had a more organic look to it. But you can totally trace around different size glasses. My starting circle was three inches across.

Step 2: Burn the edges of each of your circles. Press your thumb in the center of the circle to flip the edges upward. One tip, as your turn it try and curve up the edge in the direction you want (make sure you don’t burn your sweet little fingers!)

Step 3: Layer the circles in a pleasing way. I turned mine so each layer showed enough color so you know it’s there.

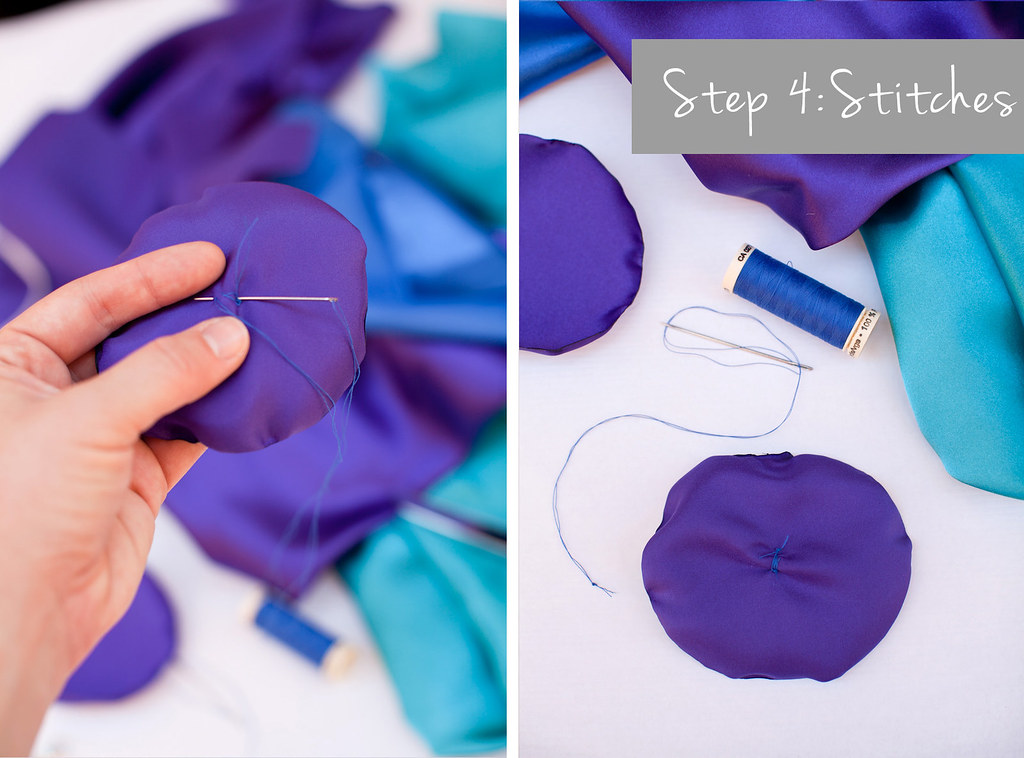
Step 4: Stitch on the button and knot it. I pulled mine tight so it cinched in the back a bit and pulled the tiniest layer into a small bunch to make it look for flowery.
Step 5: Glue on the aligator clip or bobbi-pin if you like!

Step 6: Wear it or give it away!

More layers makes it more flowery. I love them! Don’t be surprised if you get one for Christmas this year, sisters!
What do you think of this DIY project? Is it doable? Have an event, wedding, shower, birthday or otherwise? Stuck on something you need for the soiree, i.e. favors, place cards, decor, tablescapes, etc? Let me know your color scheme and theme and I’ll give it a whirl. Who knows your project could be featured next! Love the idea but don’t have time to make it? Email me and I’ll give you a quote (meg at megruth dot com).
Featured: Las Vegas Wedding Photographers
Thanks again to Little Vegas Wedding for featuring my September bride, last year, Karla and her hubby John! It was a beautiful wedding out at The Westin at Lake Las Vegas.
Check it out:

Totally check out The Westin, it’s gorgeous!
Make It Monday: DIY Matchbook Favors/Place Cards
Better late than never, eh? Eh?
I slacked last week because I was playing with my super adorable nieces in Olympia, WA. They are serious farm girls. Two cows (cheeseburger and meatball, guess what they plan to do with them?), two goats, three horses, forty chickens, two dogs, two bunnies, and a handfull of barn cats. And they plan on getting pigs! My brother builds fences and goat play grouns and leads cows around. It’s still funny to see him saunter out to do his chores.

Today I decided to show you the easiest craft project ever. Aren’t these matchbooks darling? Seriously. Look at my ingredients list people. Five ingredients. And a printer. Done and done.
What you’ll need:

- 1 piece of card stop for every 4 names
- A stack of printer paper
- Pretty paper for end sheets (optional and not shown)
- Cute string
- Paper cuter (optional if you are a glutton for punishment)


Step 3: Cut your printer paper into strips just shy of 2″ x 11″. This way they won’t poke out the edges of the card stock. Now cut them down to 5″ lengths. (At this point cut your pieces of end paper if you opted for those into pieces that match the size of the printer paper)

Step 4: Line up printer paper pieces (and end sheets on the top and bottom of the stack, if you’ve included them) on top of the card-stock strips, writing, face-up.

Step 5: Staple the edge.
Step 6: Fold the card-stock paper around the edge of the printer paper.

Step 7: Trim any excess card-stock and tuck it into the folded edge.

Step 8: Wrap the cute string around the top edge to hold in place. Wah-la!

These would make great personalized favors or place cards! For favors you could customize with your names, wedding date and a thank you! Adorbs, no? Please don’t look too closely at my hand writing, I beg you!

What do you think of this DIY project? Is it doable? Have an event, wedding, shower, birthday or otherwise? Stuck on something you need for the soiree, i.e. favors, place cards, decor, tablescapes, etc? Let me know your color scheme and theme and I’ll give it a whirl. Who knows your project could be featured next! Love the idea but don’t have time to make it? Email me and I’ll give you a quote (meg at megruth dot com).
Sneak Peek: Hannah & Dick’s Seattle Wedding
I LOVE SEATTLE! AND TREES!
There, I said it. And the only driver I had road rage at on the highway was…wait for it…a Nevadan! HA. I tell you, we are the king of crazy drivers here in Nevada.
Trees. So. Many. Trees. The desert is gorgeous but good heavens this girl loves her some trees. So, to exemplify my love for trees I photographed Hannah and Dick in trees for about an hour. They are so in love and happy, the perfect couple to photograph.

P.S. I love trees.
See Love: Crystal & Jack Boston Wedding Photographer
How on earth has it been over a year since this amazing wedding and I never posted it!?!?
What is wrong with me!?
Self scolding done.
This is the wedding of my dear sister-in-law Crystal to the love of her life, Jack. I absolutely adore these two. After the engagement session in November of 2010 I knew they were perfect for each other and Jack would be an amazing addition to the family. I mean when you can stop on ten hour drive for a quick photo session and still manage to love on each other in front of the camera, that’s devotion.
Their wedding took place in Boston, where my in-laws live. Jack is from Southern California and he had a GIANT crew fly out for the festivities. It was so great to see how many loving and supportive people were there for Crystal and Jack’s wedding day.
The two were married in the beautiful Boston LDS temple. A ring ceremony took place right after in the chapel down the hill. Of course the days surrounding the wedding were sunshiny and happy and the actual wedding day was pouring rain and freezing! BUT because of the rain there was an amazing romance throughout the day that could not be replaced. All you need to do to prepare is buy some galoshes and a couple umbrellas that match the wedding colors.
Brilliant.


Vendors love
Photography and Videography: MegRuth
Bridal Gown: Abella Bridal
Groom’s Tux: Men’s Warehouse
Bouquets and Boutonnieres: Madison Floral
Ceremony: Boston LDS Temple
Reception: New England Aquarium
Cake Artist: Konditor Meister
Chocolate Shell Favors: Green Mountain Chocolate
Photobooth & DJ: Entertainment Specialists
Be on the lookout next week for their dayafter session as well as their wedding album!
Love you Crystal and Jack!
We Love Features: Little Vegas Wedding
I was so happy with Kelly contacted me from Little Vegas Wedding! We’ve needed a local wedding blog to feature all the awesome vendors and locations all around Vegas. There are so many fantastic people and spots here that it’s hard to be informed on everything. I love that Kelly took on the challenge and is meeting the needs of our town so wonderfully!
Plus, the blog is SUPER cute. A little vintage Las Vegas. Darling.
She was kind enough to feature two of my couples, and I’m happy that they’re now part of the collection that will br s great resource for future couples coming to the LV.
The first wedding featured was Katie and Ryan’s fab vintage affair at Springs Preserve and Joe’s Stone Crab and Steakhouse. And! They’re expecting their fist baby! Woot, woot!

It’s no secret how much I adore Steph and Dan. Steph has become such an advocate for me and my projects and I so appreciate it! This is the second time her simply retro wedding has been featured. Great style is always rewarded. Congrats again to the happy couple!

Thanks Kelly!! Look forward to seeing your blog baby grow like the wind!